In a modern Windows OS, when you click Start/Accessories/System Tools/Disk Cleanup you will note a dialog which will eventually present you with choices of files to remove from your computer. These are left over files from various activities and will look something like this:
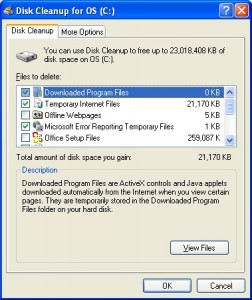
Disk Cleanup can assist you in removing no longer needed files
Now you are able to select the categories you want to remove, for example, Temporary Internet Files, Microsoft Error Reporting Temporary Files, Recycle Bin, Temporary Files, WebClient/Publisher Temporary Files, etc. Note these are all temporary files. There are also other categories you should normally never select. These include Office Setup Files, Log Files, Compress Old Files and Catalog files for the Content Indexer. Please note Windows Vista and Windows 7 users will have more options available.
If this is the first time you have ran CleanMgr (Disk Cleanup), the initial scan process could take quite some time. These scan’s may take in excess of an hour. Microsoft had provided a way to streamline this process through preferences, but you have to use the Command Prompt to take advantage of it.
To get started we’ll need to use the CMD prompt. Alternatly, you can “Run” a command from the “Start Button” this will work too.
Let’s start with the CMD prompt:
For Windows XP click Start/Run/CMD
For Windows 7 click Start/All Programs/Accessories/Command Prompt
This will open a Command Console allowing you to type in the following command:
cleanmgr.exe /sageset:99
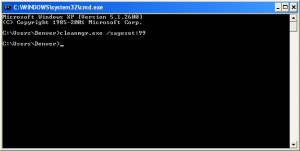
Running CleanMgr from the Command Prompt
This will bring up a new Disk Cleanup Settings window
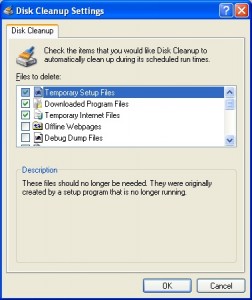
- Using the Sageset switch
On Windows XP computers, you should usually select the following categories: Temporary Setup Files, Downloaded Program FIles, Temporary Internet Files, Microsoft Error Reporting Temporary Files, Old Chkdsk files, Recycle Bin, Temporary Remote Desktop files, Temporary Files, WebClient/Publisher Temporary Files, Catalog files for the Content Indexer. Optionally you could select Debug Dump Files and Offline Webpages as well. You should almost NEVER select Office Setup Files.
On Windows 7 computers, you should usually select the following categories: Temporary Setup Files, Downloaded Program Files, Temporary Internet Files, Debug Dump Files, Old Chkdsk files, Recycle Bin, Service Pack Backup Files, System error memory dump files, System error minidump files, Temporary Files, Temporary Windows installation files, Thumbnails, Files discarded by Windows upgrade, Per user archived Windows Error Reporting Files, System archived Windows Error Reporting Files
Once you have made your selections, Click OK.
Now that you have saved your settings, run the following command:
cleanmgr.exe /sagerun:99
![]()
- The Sagerun Switch

This process could take some time to complete and will run on all attached drives. So if you have network drives or external drives you do not want included, be sure to disconnect or remove these drives.
For more information about using CleanMgr from the command line please reference:
http://support.microsoft.com/default.aspx?scid=kb;en-us;Q315246 (for Windows XP)
http://windows.microsoft.com/en-us/windows7/Delete-files-using-Disk-Cleanup (For Windows 7)
my PC Techs provides expert computer repair and computer consulting services to the Phoenix metro area. For more information or to schedule an appointment please call (602) 456-0150.


